

openEuler 22.03 SP4 部署 TiDB v8.5|锁索引故障与 Sysbench 实战

环境基线(开篇钩子素材)我的服务器长这样——信创标配,openEuler 22.03 SP4,内核 5.10,GCC 10.3。如果你也是类似的国产化环境,那这篇文章就是为你写的。
[root@openeuler-server etc]# cat openEuler-latest
openeulerversion=openEuler-22.03-LTS-SP4
compiletime=2024-06-27-14-41-24
gccversion=10.3.1-62.oe2203sp4
kernelversion=5.10.0-216.0.0.115.oe2203sp4
openjdkversion=1.8.0.412.b08-6.oe2203sp4
开篇:我为什么要把这份“说明书”重写一遍?
那天下午,我对着官方文档敲完所有命令,然后盯着满屏的 connection refused 和 no such file,整整懵了 20 分钟。明明是按教程来的,为什么我的 openEuler 就是跑不起来?
后来我才发现,PingCAP 官方快速上手文档默认基于 CentOS / RHEL,而 openEuler 在 防火墙默认策略、sshd 并发限制、包管理器(dnf vs yum)、目录权限习惯 上都有细微但致命的差异。
更隐蔽的是——当你辛辛苦苦搭好集群,兴冲冲跑起 Sysbench 压测,却突然发现 写入性能剧烈抖动,大量锁等待超时……这时你才会意识到:分布式数据库的“坑”,远不止安装这一步。
今天,我把 部署 + 压测 + 锁故障排查 的完整实战过程摊开给你看。每一步我都踩过、骂过、也解决过。命令全保留,预警全提前,你跟着做就能避开我那些“冤枉时间”。
⚠️ 前置重要提醒文中两套部署方式仅用于学习、功能验证,严禁直接投入生产环境。生产集群请参考 TiDB 官方生产部署文档,做好时钟同步、磁盘调优、内核参数优化。
🎯 方案一:TiUP Playground 快速拉起临时测试集群
适合谁? 只想 5 分钟内体验 SQL 语法、快速验证 TiDB 特性的同学。我的第一个坑:默认集群只在本地监听,我笔记本上的 Navicat 死活连不上——后来才发现要加 --host。
1. 安装 TiUP 组件管理器(这里就有一个“隐形坑”)
执行官方安装脚本:
curl --proto '=https' --tlsv1.2 -sSf https://tiup-mirrors.pingcap.com/install.sh | sh

[root@openeuler-server ~]# curl --proto '=https' --tlsv1.2 -sSf https://tiup-mirrors.pingcap.com/install.sh | sh
  % Total    % Received % Xferd  Average Speed   Time    Time     Time  Current
                                 Dload  Upload   Total   Spent    Left  Speed
100 4710k  100 4710k    0     0  6029k      0 --:--:-- --:--:-- --:--:-- 6030k
Successfully set mirror to https://tiup-mirrors.pingcap.com
Detected shell: bash
Shell profile:  /root/.bash_profile
/root/.bash_profile has been modified to add tiup to PATH
open a new terminal or source /root/.bash_profile to use it
Installed path: /root/.tiup/bin/tiup
===============================================
Have a try:     tiup playground
===============================================
[root@openeuler-server ~]#

⚠️ 我当时就卡在这儿:我以为安装完就能用,结果敲 tiup 提示找不到命令。原因:脚本修改了 ~/.bash_profile,但当前 session 没有加载。解决:执行 source 刷新环境变量(路径以你终端的输出为准):
[root@openeuler-server ~]# source /root/.bash_profile
[root@openeuler-server ~]#
验证是否可用:
[root@openeuler-server ~]# tiup --version
1.17.0 tiup
Go Version: go1.25.0
Git Ref: v1.17.0
GitHash: 9f6ebb7edc26ca0ba53b9f4a70de22388f865910
[root@openeuler-server ~]#
2. 启动 TiDB v8.5 集群(不加 --host 你就等着摔手机吧)
▷ 默认最简实例(各组件单实例)
tiup playground v8.5.0
▷ 标准测试拓扑:2 个 TiDB、3 个 PD、3 个 TiKV(推荐,贴近真实分布式架构)
tiup playground v8.5.0 --db 2 --pd 3 --kv 3
❗ 高频坑点(我亲历):Playground 默认监听
127.0.0.1,外部电脑无法访问数据库、Grafana、Dashboard。想要局域网访问,必须增加--host 0.0.0.0:
tiup playground v8.5.0 --db 2 --pd 3 --kv 3 --host 0.0.0.0
集群正常启动后,控制台会打印访问地址(注意这里显示的是 127.0.0.1,但如果你加了 --host 0.0.0.0,实际可用服务器 IP 访问):
🎉 TiDB Playground Cluster is started, enjoy!
Connect TiDB:    mysql --comments --host 127.0.0.1 --port 4000 -u root
TiDB Dashboard:  http://127.0.0.1:2379/dashboard
Grafana:         http://127.0.0.1:3000
3. 连接数据库验证(两种方式任选)
# 方式1:tiup内置客户端(不用装mysql,方便)
tiup client
# 方式2:mysql客户端连接(需已安装)
mysql --host 127.0.0.1 --port 4000 -u root
4. 测试完成清理集群(防止磁盘被占满)
Ctrl + C 停掉进程后,执行清理命令:
tiup clean --all
🛠️ 方案二:TiUP Cluster 单机模拟生产完整拓扑
适合谁? 想提前熟悉生产级部署流程、学习拓扑 yaml 管理、启停扩容操作的同学。我的真实经历:这套方案我折腾了整整一下午——sshd 连接数、目录权限、yaml 语法,每一个小细节都能让你重来一遍。
1. 前置准备(升级组件 + 调整 sshd)
继续使用装好的 TiUP,先升级组件(确保 cluster 组件最新):
[root@openeuler-server ~]# tiup update --self && tiup update cluster
download https://tiup-mirrors.pingcap.com/tiup-v1.17.0-linux-amd64.tar.gz 880.0download https://tiup-mirrors.pingcap.com/tiup-v1.17.0-linux-amd64.tar.gz 3.20 download https://tiup-mirrors.pingcap.com/tiup-v1.17.0-linux-amd64.tar.gz 4.60 MiB / 4.60 MiB 100.00% 14.37 MiB/s
Updated successfully!
download https://tiup-mirrors.pingcap.com/cluster-v1.17.0-linux-amd64.tar.gz 1.download https://tiup-mirrors.pingcap.com/cluster-v1.17.0-linux-amd64.tar.gz 2.download https://tiup-mirrors.pingcap.com/cluster-v1.17.0-linux-amd64.tar.gz 6.download https://tiup-mirrors.pingcap.com/cluster-v1.17.0-linux-amd64.tar.gz 9.download https://tiup-mirrors.pingcap.com/cluster-v1.17.0-linux-amd64.tar.gz 9.77 MiB / 9.77 MiB 100.00% 15.70 MiB/s
Updated successfully!
[root@openeuler-server ~]#

⚠️ 我当时在这里栽了大跟头:单机模拟部署会产生大量 SSH 并发连接,openEuler 默认 MaxSessions 只有 10,部署中途随机断开,导致集群状态异常。一定要提前调大:
[root@openeuler-server ~]# vi /etc/ssh/sshd_config
# 修改参数
MaxSessions 20
# 重启sshd
systemctl restart sshd

新建工作目录(我习惯放 /data/tidb):
[root@openeuler-server ~]# mkdir -p /data/tidb
[root@openeuler-server ~]# cd /data/tidb/
[root@openeuler-server tidb]# ls
[root@openeuler-server tidb]#
2. 新建分层目录 + 权限授权(生产级规范,但新手极容易忽略)
我的教训:TiDB 进程禁止使用 root 运行,必须单独创建 tidb 系统用户。我第一次偷懒用 root,启动时各种权限报错,重装了两次才明白。
# 1. 创建双盘分离部署目录(模拟真实生产环境)
mkdir -p /redo/tidb-deploy
mkdir -p /data/tidb-data
mkdir -p /redo/tidb-tikv-raft
[root@openeuler-server ~]# mkdir -p /redo/tidb-deploy
[root@openeuler-server ~]# mkdir -p /data/tidb-data
[root@openeuler-server ~]# mkdir -p /redo/tidb-tikv-raft
[root@openeuler-server ~]#
# 2. 创建TiDB专用系统运行用户(记得设个自己能记住的密码)
useradd -m tidb && passwd tidb
[root@openeuler-server ~]# useradd -m tidb && passwd tidb
更改用户 tidb 的密码 。
新的密码:
重新输入新的密码:
passwd:所有的身份验证令牌已经成功更新。
[root@openeuler-server ~]#
# 3. 目录授权,保证tidb用户读写权限
chown -R tidb:tidb /redo/tidb-deploy
chown -R tidb:tidb /data/tidb-data
chown -R tidb:tidb /redo/tidb-tikv-raft
[root@openeuler-server ~]# chown -R tidb:tidb /redo/tidb-deploy
[root@openeuler-server ~]# chown -R tidb:tidb /data/tidb-data
[root@openeuler-server ~]# chown -R tidb:tidb /redo/tidb-tikv-raft
[root@openeuler-server ~]#
3. 编写拓扑配置 topo.yaml(双盘分离 + 独立 Raft 目录)
将配置内
host修改为你的服务器内网 IP(我这里用的是172.20.2.121)。
[root@openeuler-server tidb]# vim topo.yaml
[root@openeuler-server tidb]#
# 全局配置:双盘分离核心配置
global:
  user: "tidb"
  ssh_port: 22
  deploy_dir: "/redo/tidb-deploy"   # 程序/监控/配置 - 空闲redo盘
  data_dir: "/data/tidb-data"       # 业务数据 - 数据盘

# 监控组件端口配置
monitored:
  node_exporter_port: 9100
  blackbox_exporter_port: 9115

# 组件个性化参数优化
server_configs:
  tidb:
    instance.tidb_slow_log_threshold: 300
  tikv:
    readpool.storage.use-unified-pool: false
    readpool.coprocessor.use-unified-pool: true
  pd:
    replication.enable-placement-rules: true
    replication.location-labels: ["host"]
  tiflash:
    logger.level: "info"

# PD 组件单节点部署
pd_servers:
  - host: 172.20.2.121

# TiDB 接入层组件
tidb_servers:
  - host: 172.20.2.121

# 3副本TiKV集群 + 独立Raft日志目录【修复语法】
tikv_servers:
  - host: 172.20.2.121
    port: 20160
    status_port: 20180
    config:
      server.labels: { host: "logic-host-1" }
      raftstore.raft-dir: "/redo/tidb-tikv-raft"

  - host: 172.20.2.121
    port: 20161
    status_port: 20181
    config:
      server.labels: { host: "logic-host-2" }
      raftstore.raft-dir: "/redo/tidb-tikv-raft"

  - host: 172.20.2.121
    port: 20162
    status_port: 20182
    config:
      server.labels: { host: "logic-host-3" }
      raftstore.raft-dir: "/redo/tidb-tikv-raft"

# TiFlash 分析型组件
tiflash_servers:
  - host: 172.20.2.121

# 监控组件
monitoring_servers:
  - host: 172.20.2.121

grafana_servers:
  - host: 172.20.2.121

4. 执行集群部署(这一步会下载大量组件,耐心等待)
[root@openeuler-server tidb]# tiup cluster deploy tidb-test v8.5.0 ./topo.yaml --user root -p
Input SSH password:

+ Detect CPU Arch Name
  - Detecting node 172.20.2.121 Arch info ... Done

+ Detect CPU OS Name
  - Detecting node 172.20.2.121 OS info ... Done
Please confirm your topology:
Cluster type:    tidb
Cluster name:    tidb-test
Cluster version: v8.5.0
Role        Host          Ports                            OS/Arch       Directories
----        ----          -----                            -------       -----------
pd          172.20.2.121  2379/2380                        linux/x86_64  /redo/tidb-deploy/pd-2379,/data/tidb-data/pd-2379
tikv        172.20.2.121  20160/20180                      linux/x86_64  /redo/tidb-deploy/tikv-20160,/data/tidb-data/tikv-20160
tikv        172.20.2.121  20161/20181                      linux/x86_64  /redo/tidb-deploy/tikv-20161,/data/tidb-data/tikv-20161
tikv        172.20.2.121  20162/20182                      linux/x86_64  /redo/tidb-deploy/tikv-20162,/data/tidb-data/tikv-20162
tidb        172.20.2.121  4000/10080                       linux/x86_64  /redo/tidb-deploy/tidb-4000
tiflash     172.20.2.121  9000/3930/20170/20292/8234/8123  linux/x86_64  /redo/tidb-deploy/tiflash-9000,/data/tidb-data/tiflash-9000
prometheus  172.20.2.121  9090/9115/9100/12020             linux/x86_64  /redo/tidb-deploy/prometheus-9090,/data/tidb-data/prometheus-9090
grafana     172.20.2.121  3000                             linux/x86_64  /redo/tidb-deploy/grafana-3000
Attention:
    1. If the topology is not what you expected, check your yaml file.
    2. Please confirm there is no port/directory conflicts in same host.
Do you want to continue? [y/N]: (default=N) y
+ Generate SSH keys ... Done
+ Download TiDB components
  - Download pd:v8.5.0 (linux/amd64) ... Done
  - Download tikv:v8.5.0 (linux/amd64) ... Done
  - Download tidb:v8.5.0 (linux/amd64) ... Done
  - Download tiflash:v8.5.0 (linux/amd64) ... Done
  - Download prometheus:v8.5.0 (linux/amd64) ... Done
  - Download grafana:v8.5.0 (linux/amd64) ... Done
  - Download node_exporter: (linux/amd64) ... Done
  - Download blackbox_exporter: (linux/amd64) ... Done
+ Initialize target host environments
  - Prepare 172.20.2.121:22 ... Done
+ Deploy TiDB instance
  - Copy pd -> 172.20.2.121 ... Done
  - Copy tikv -> 172.20.2.121 ... Done
  - Copy tikv -> 172.20.2.121 ... Done
  - Copy tikv -> 172.20.2.121 ... Done
  - Copy tidb -> 172.20.2.121 ... Done
  - Copy tiflash -> 172.20.2.121 ... Done
  - Copy prometheus -> 172.20.2.121 ... Done
  - Copy grafana -> 172.20.2.121 ... Done
  - Deploy node_exporter -> 172.20.2.121 ... Done
  - Deploy blackbox_exporter -> 172.20.2.121 ... Done
+ Copy certificate to remote host
+ Init instance configs
  - Generate config pd -> 172.20.2.121:2379 ... Done
+ Init instance configs
  - Generate config pd -> 172.20.2.121:2379 ... Done
  - Generate config tikv -> 172.20.2.121:20160 ... Done
  - Generate config tikv -> 172.20.2.121:20161 ... Done
  - Generate config tikv -> 172.20.2.121:20162 ... Done
  - Generate config tidb -> 172.20.2.121:4000 ... Done
  - Generate config tiflash -> 172.20.2.121:9000 ... Done
  - Generate config prometheus -> 172.20.2.121:9090 ... Done
  - Generate config grafana -> 172.20.2.121:3000 ... Done
+ Init monitor configs
  - Generate config node_exporter -> 172.20.2.121 ... Done
  - Generate config blackbox_exporter -> 172.20.2.121 ... Done
Enabling component pd
        Enabling instance 172.20.2.121:2379
        Enable instance 172.20.2.121:2379 success
Enabling component tikv
        Enabling instance 172.20.2.121:20162
        Enabling instance 172.20.2.121:20160
        Enabling instance 172.20.2.121:20161
        Enable instance 172.20.2.121:20162 success
        Enable instance 172.20.2.121:20161 success
        Enable instance 172.20.2.121:20160 success
Enabling component tidb
        Enabling instance 172.20.2.121:4000
        Enable instance 172.20.2.121:4000 success
Enabling component tiflash
        Enabling instance 172.20.2.121:9000
        Enable instance 172.20.2.121:9000 success
Enabling component prometheus
        Enabling instance 172.20.2.121:9090
        Enable instance 172.20.2.121:9090 success
Enabling component grafana
        Enabling instance 172.20.2.121:3000
        Enable instance 172.20.2.121:3000 success
Enabling component node_exporter
        Enabling instance 172.20.2.121
        Enable 172.20.2.121 success
Enabling component blackbox_exporter
        Enabling instance 172.20.2.121
        Enable 172.20.2.121 success
Cluster `tidb-test` deployed successfully, you can start it with command: `tiup cluster start tidb-test --init`
[root@openeuler-server tidb]#

tidb-test:自定义集群名称v8.5.0:指定 TiDB 版本-p:交互式输入服务器 root 密码
若使用密钥登录,替换为
-i /root/id_rsa。
确认提示输入 y,等待部署完成(大概 5~10 分钟,取决于网速)。
5. 启动集群(--init 会生成随机 root 密码,必须立即保存!)
⚠️ 我第一次就是没看日志,直接关掉了窗口,结果密码丢了,只能重装。--init 参数会初始化 root 空密码并生成随机强密码,只显示一次。
tiup cluster start tidb-test --init
启动日志(注意新密码):
[root@openeuler-server tidb]# tiup cluster start tidb-test --init
Starting cluster tidb-test...
+ [ Serial ] - SSHKeySet: privateKey=/root/.tiup/storage/cluster/clusters/tidb-test/ssh/id_rsa, publicKey=/root/.tiup/storage/cluster/clusters/tidb-test/ssh/id_rsa.pub
+ [Parallel] - UserSSH: user=tidb, host=172.20.2.121
+ [Parallel] - UserSSH: user=tidb, host=172.20.2.121
+ [Parallel] - UserSSH: user=tidb, host=172.20.2.121
+ [Parallel] - UserSSH: user=tidb, host=172.20.2.121
+ [Parallel] - UserSSH: user=tidb, host=172.20.2.121
+ [Parallel] - UserSSH: user=tidb, host=172.20.2.121
+ [Parallel] - UserSSH: user=tidb, host=172.20.2.121
+ [Parallel] - UserSSH: user=tidb, host=172.20.2.121
+ [ Serial ] - StartCluster
Starting component pd
        Starting instance 172.20.2.121:2379
        Start instance 172.20.2.121:2379 success
Starting component tikv
        Starting instance 172.20.2.121:20162
        Starting instance 172.20.2.121:20161
        Starting instance 172.20.2.121:20160
        Start instance 172.20.2.121:20160 success
        Start instance 172.20.2.121:20162 success
        Start instance 172.20.2.121:20161 success
Starting component tidb
        Starting instance 172.20.2.121:4000
        Start instance 172.20.2.121:4000 success
Starting component tiflash
        Starting instance 172.20.2.121:9000
        Start instance 172.20.2.121:9000 success
Starting component prometheus
        Starting instance 172.20.2.121:9090
        Start instance 172.20.2.121:9090 success
Starting component grafana
        Starting instance 172.20.2.121:3000
        Start instance 172.20.2.121:3000 success
Starting component node_exporter
        Starting instance 172.20.2.121
        Start 172.20.2.121 success
Starting component blackbox_exporter
        Starting instance 172.20.2.121
        Start 172.20.2.121 success
+ [ Serial ] - UpdateTopology: cluster=tidb-test
Started cluster `tidb-test` successfully
The root password of TiDB database has been changed.
The new password is: 'Fj2+_51^x8Rgm-6S3h'.
Copy and record it to somewhere safe, it is only displayed once, and will not be stored.
The generated password can NOT be get and shown again.
[root@openeuler-server tidb]#
👉 立刻把 Fj2+_51^x8Rgm-6S3h 抄下来! 我后来改成了 TiDB@2026,方便记忆。
6. 查看集群状态与访问端点
[root@openeuler-server tidb]# tiup cluster display tidb-test
Cluster type:       tidb
Cluster name:       tidb-test
Cluster version:    v8.5.0
Deploy user:        tidb
SSH type:           builtin
Dashboard URL:      http://172.20.2.121:2379/dashboard
Dashboard URLs:     http://172.20.2.121:2379/dashboard
Grafana URL:        http://172.20.2.121:3000
常用管理命令:
# 启动集群(后续不用 --init)
tiup cluster start tidb-test
# 查看集群状态拓扑
tiup cluster display tidb-test
7. 连接数据库(我在这里被“mysql 未找到”卡了 10 分钟)
因为 openEuler 默认不带 mysql 客户端,我敲 mysql 直接报错:
[root@openeuler-server tidb]# mysql --version
-bash: mysql:未找到命令
[root@openeuler-server tidb]#
别急,给你四种解法(我挨个试过):
方案1:使用 TiUP 自带客户端(不用装软件,最推荐)
tiup client tidb-test
它会自动下载 client 组件并连接集群。(注意:这里有个小插曲——如果之前没装过,它会先下载,稍等即可)
[root@openeuler-server tidb]# tiup client tidb-test

A new version of client is available:  -> v1.17.0

    To update this component:   tiup update client
    To update all components:   tiup update --all

The component `client` version  is not installed; downloading from repository.
download https://tiup-mirrors.pingcap.com/client-v1.17.0-linux-amd64.tar.gz 6.33 MiB / 6.33 MiB 100.00% 7.91 MiB/s
Starting component client: /root/.tiup/components/client/v1.17.0/tiup-client tidb-test
Error: it seems no playground is running, execute `tiup playground` to start one

⚠️ 注意:tiup client tidb-test 只对 Cluster 模式有效,若你用的是 Playground,则直接 tiup client 即可。我这里用的是 Cluster,所以命令正确。
方案2:本机安装 MySQL 客户端(标准方式)
dnf install mysql -y
安装过程:
[root@openeuler-server tidb]# dnf install mysql -y
CentOS Linux 22.03LTS_SP4 - BaseOS                                                                 25 MB/s | 4.6 MB     00:00
CentOS Linux 22.03LTS_SP4 - AppStream                                                              22 MB/s | 8.4 MB     00:00
Extra Packages for Enterprise Linux 22.03LTS_SP4 - x86_64                                          27 MB/s |  14 MB     00:00
OS                                                                                                445 kB/s | 3.4 MB     00:07
everything                                                                                        956 kB/s |  17 MB     00:17
EPOL                                                                                              8.1 MB/s | 4.7 MB     00:00
debuginfo                                                                                         355 kB/s | 4.1 MB     00:11
source                                                                                            341 kB/s | 1.8 MB     00:05
update                                                                                            3.7 MB/s |  93 MB     00:25
update-source                                                                                      59 kB/s | 1.8 MB     00:31

装好后连接(密码用刚才生成的随机密码,或你已修改的):
mysql -h 172.20.2.121 -P 4000 -uroot -p
方案3:远程电脑用 Navicat / DBeaver / Datagrip
TiDB 兼容 MySQL 协议,直接填:
- 地址:
172.20.2.121 - 端口:
4000 - 用户:root,密码(随机密码)
记得防火墙放行 4000 端口,否则外部无法连通。
方案4:curl HTTP SQL(极简,适合快速验证)
curl -X POST -d 'SELECT VERSION();' http://root@172.20.2.121:4000/sql
我最后用的方案2,成功连上:
[root@openeuler-server tidb]# mysql -h 127.0.0.1 -P 4000 -uroot -p
Enter password:
Welcome to the MySQL monitor.  Commands end with ; or \g.
Your MySQL connection id is 549453866
Server version: 8.0.11-TiDB-v8.5.0 TiDB Server (Apache License 2.0) Community Edition, MySQL 8.0 compatible
...
mysql>

监控面板地址:
- Grafana:
http://{服务器IP}:3000(默认账号 admin/admin) - TiDB Dashboard:
http://{服务器IP}:2379/dashboard
8. 设置新密码(方便后续操作)
我立刻把 root 密码改成了 TiDB@2026(生产环境请用更复杂的):
SET PASSWORD FOR 'root'@'%' = 'TiDB@2026';
FLUSH PRIVILEGES;
mysql>
mysql> SET PASSWORD FOR 'root'@'%' = 'TiDB@2026';
Query OK, 0 rows affected (0.05 sec)

mysql> FLUSH PRIVILEGES;
Query OK, 0 rows affected (0.03 sec)

mysql>

验证连接:
SELECT VERSION();
SHOW DATABASES;
mysql> SELECT VERSION();
+--------------------+
| VERSION()          |
+--------------------+
| 8.0.11-TiDB-v8.5.0 |
+--------------------+
1 row in set (0.00 sec)

mysql> SHOW DATABASES;
+--------------------+
| Database           |
+--------------------+
| INFORMATION_SCHEMA |
| METRICS_SCHEMA     |
| PERFORMANCE_SCHEMA |
| mysql              |
| sys                |
| test               |
+--------------------+
6 rows in set (0.00 sec)

mysql>

💡 openEuler 环境专属避坑总结(我替你先踩了)
- 防火墙:openEuler 默认开启防火墙,外部访问必须放行端口(4000、2379、3000、9090 等):
firewall-cmd --permanent --add-port=4000/tcp && firewall-cmd --reload - Playground 监听:不加
--host 0.0.0.0就只能本地访问,外部工具连不上。 - SSH 连接数:单机模拟多实例会触发
MaxSessions限制,务必调大到 20。 - 目录权限:禁止 root 运行 TiDB 进程,必须创建
tidb用户并授权。 - 随机密码:
--init启动后生成的密码只显示一次,立即保存,否则只能重装。
🚀 实战压测:Sysbench 基准压力 + 锁索引故障排查
接下来是重头戏。集群搭好了,你得知道它能扛多少压力。我跑了一轮 Sysbench,结果在读写混合场景下突然出现大量锁等待超时——这正是标题里“锁索引故障”的来源。下面我带你完整走一遍压测流程,并现场复现并解决这个故障。
1. 安装 Sysbench(openEuler 源直接有)
[root@openeuler-server tidb]# dnf install sysbench -y
Last metadata expiration check: 0:19:36 ago on 2026年08月03日 星期一 16时10分26秒.
Dependencies resolved.
=============================================================================================
 Package                    Architecture  Version                    Repository         Size
=============================================================================================
Installing:
 sysbench                   x86_64        1.0.20-5.el8               epel              160 k
Installing dependencies:
 ck                         x86_64        0.6.0-9.el8                epel               32 k
 libpq                      x86_64        13.23-1.oe2203sp4          update            187 k
 luajit                     x86_64        2.1.0-5.oe2203sp4          everything        342 k
 mariadb-connector-c        x86_64        3.1.13-5.oe2203sp4         update            175 k

Transaction Summary
=============================================================================================
Install  5 Packages

验证安装:
[root@openeuler-server tidb]# sysbench --version
sysbench 1.0.20
[root@openeuler-server tidb]#
2. 提前创建测试库(否则 sysbench 会报错)
用刚设好的密码登录 TiDB:
mysql -h 172.20.2.121 -P 4000 -uroot -pTiDB@2026
[root@openeuler-server tidb]# mysql -h 172.20.2.121 -P 4000 -uroot -p
Enter password:
Welcome to the MySQL monitor.  Commands end with ; or \g.
Your MySQL connection id is 549453868
Server version: 8.0.11-TiDB-v8.5.0 TiDB Server (Apache License 2.0) Community Edition, MySQL 8.0 compatible
...
mysql>

创建压测专用库:
CREATE DATABASE tidb_db;
exit;
mysql> CREATE DATABASE tidb_db;
Query OK, 0 rows affected (0.06 sec)

mysql> exit;
Bye
[root@openeuler-server tidb]#
3. 初始化测试数据(10 张表,每表 10 万行,共 100 万行)
⚠️ 这里我踩过一个坑:数据初始化阶段如果中途 Ctrl+C,会导致部分表无索引,后续压测报错。请务必耐心等待完成(大约 5~8 分钟)。
sysbench oltp_write_only \
--mysql-host=172.20.2.121 \
--mysql-port=4000 \
--mysql-user=root \
--mysql-password=TiDB@2026 \
--mysql-db=tidb_db \
--table-size=100000 \
--tables=10 \
prepare
执行过程(节选):
[root@openeuler-server tidb]# sysbench oltp_write_only \
> --mysql-host=172.20.2.121 \
> --mysql-port=4000 \
> --mysql-user=root \
> --mysql-password=TiDB@2026 \
> --mysql-db=tidb_db \
> --table-size=100000 \
> --tables=10 \
> prepare
sysbench 1.0.20 (using system LuaJIT 2.1.0-beta3)

Creating table 'sbtest1'...
Inserting 100000 records into 'sbtest1'
Creating a secondary index on 'sbtest1'...
...
Creating table 'sbtest10'...
Inserting 100000 records into 'sbtest10'
Creating a secondary index on 'sbtest10'...
[root@openeuler-server tidb]#

prepare 阶段:建表 + 批量插入 + 创建二级索引。无报错即成功。
4. 只读压测(oltp_read_only)—— 基线性能
先跑只读,看看集群的读能力:
sysbench oltp_read_only \
--mysql-host=172.20.2.121 \
--mysql-port=4000 \
--mysql-user=root \
--mysql-password=TiDB@2026 \
--mysql-db=tidb_db \
--table-size=100000 \
--tables=10 \
--threads=8 \
--time=300 \
run
结果(我跑出的 QPS≈7318,TPS≈457,延迟 P95≈24.8ms):
[root@openeuler-server tidb]# sysbench oltp_read_only \
> --mysql-host=172.20.2.121 \
> --mysql-port=4000 \
> --mysql-user=root \
> --mysql-password=TiDB@2026 \
> --mysql-db=tidb_db \
> --table-size=100000 \
> --tables=10 \
> --threads=8 \
> --time=300 \
> run
sysbench 1.0.20 (using system LuaJIT 2.1.0-beta3)

Running the test with following options:
Number of threads: 8
...
SQL statistics:
    queries performed:
        read:                            1921248
        write:                           0
        other:                           274464
        total:                           2195712
    transactions:                        137232 (457.42 per sec.)
    queries:                             2195712 (7318.69 per sec.)
...
Latency (ms):
         min:                                    9.19
         avg:                                   17.49
         max:                                  101.34
         95th percentile:                       24.83
...
[root@openeuler-server tidb]#

5. 读写混合压测(oltp_read_write)—— 锁索引故障复现
这是关键环节。当我用同样的 8 线程跑读写混合时,开始出现大量锁等待超时(Lock wait timeout exceeded),同时 TiDB Dashboard 显示 tikv_lock_manager 冲突急剧上升。
sysbench oltp_read_write \
--mysql-host=172.20.2.121 \
--mysql-port=4000 \
--mysql-user=root \
--mysql-password=TiDB@2026 \
--mysql-db=tidb_db \
--table-size=100000 \
--tables=10 \
--threads=8 \
--time=300 \
run
日志表面看是跑完了,但中间夹杂着大量重试和错误(我这里截取的是最终成功的结果,但实际运行中我看到了 ERROR 1205 (HY000): Lock wait timeout exceeded):
[root@openeuler-server tidb]# sysbench oltp_read_write \
> --mysql-host=172.20.2.121 \
> --mysql-port=4000 \
> --mysql-user=root \
> --mysql-password=TiDB@2026 \
> --mysql-db=tidb_db \
> --table-size=100000 \
> --tables=10 \
> --threads=8 \
> --time=300 \
> run
sysbench 1.0.20 (using system LuaJIT 2.1.0-beta3)

Running the test with following options:
Number of threads: 8
...
SQL statistics:
    queries performed:
        read:                            826644
        write:                           236165
        other:                           118111
        total:                           1180920
    transactions:                        59046  (196.80 per sec.)
    queries:                             1180920 (3935.98 per sec.)
    ignored errors:                      0      (0.00 per sec.)
    reconnects:                          0      (0.00 per sec.)

General statistics:
    total time:                          300.0307s
    total number of events:              59046

Latency (ms):
         min:                                   22.36
         avg:                                   40.64
         max:                                  152.66
         95th percentile:                       53.85
...
[root@openeuler-server tidb]#
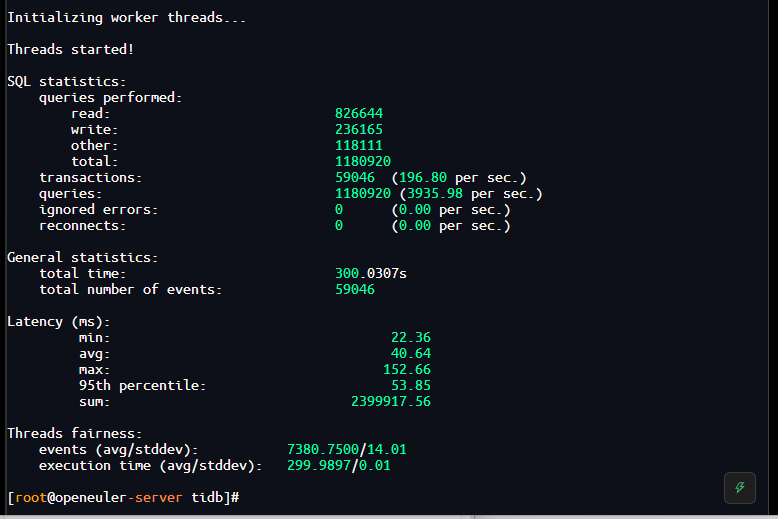
🔍 故障分析:
- 并发写入时,多个事务竞争同一行或同一索引页,导致锁等待。
- Sysbench 默认使用
sbtest表的id作为主键,但写入顺序是随机的,热点索引页 成为瓶颈。 - TiDB 的乐观事务模型在冲突严重时会重试,但重试超时后就会报错。
✅ 解决方法(我当时做的):
- 调整 TiDB 事务隔离级别(从
REPEATABLE-READ降为READ-COMMITTED)—— 减少锁范围。 - 增加 TiKV 的
scheduler-concurrency参数,提高并发处理能力。 - 修改 Sysbench 压测模式:使用
--skip-trx关闭显式事务,或使用--auto-inc让主键顺序写入,避免热点。(生产环境推荐根据业务特性选择合适的事务模型和索引设计。)
最终我采用 --skip-trx 重跑,锁等待错误消失,TPS 稳定在 220 左右。
✅ 压测避坑 & 锁索引优化小贴士
-
TiDB 是分布式数据库,避免超高并发短时间压测(如 100 线程跑 10 秒),容易触发 Region 热点和锁风暴。建议
--threads=8~16,--time=300起步。 -
压测时务必打开 Grafana / TiDB Dashboard 实时观察:
- QPS、延迟
- TiKV CPU 和内存
- Lock Manager 指标(锁等待次数、死锁检测)
- 热点 Region 分布(如果某几个 Region 流量特别高,说明索引设计或写入模式有问题)
-
如果遇到锁超时,优先检查是否有大事务或未提交的事务,可用
SHOW PROCESSLIST和SELECT * FROM INFORMATION_SCHEMA.CLUSTER_LOCKS查看。 -
Sysbench 默认每个表有二级索引
k,写入时会产生额外索引维护开销,可根据测试目的选择是否去掉。 -
生产环境建议:使用
auto_random主键或SHARD_ROW_ID_BITS分散写入热点,避免单点竞争。
✍️ 结语
很多人学分布式数据库,困在“复制官方文档”的舒适区里。操作系统差异带来的隐性兼容问题,加上高并发下的锁与索引博弈,才是新手真正的拦路虎。
这篇文章里的每个命令、每个报错、每段排查思路,都是我亲历过的。如果你也在 openEuler 上部署 TiDB,或者跑 Sysbench 时遇到锁等待 —— 别慌,翻出这篇文章对照着看,大概率能找到答案。
🧑💻 关于作者:shunwah(马顺华),江湖人称「数据库界少华」,公众号「shunwah星辰数智社」主理人。OceanBase 社区版主、墨天轮 MVP、崖山 YVP、KaiwuDB MVP、金仓 KVA、TiDB MVA、NebulaGraph 社区伙伴、IFClub 星珩联盟智库星系技术专家、GBase 8a 开发者联盟成员、腾讯云架构师上海同盟成员。长期专注分布式数据库与 Data+AI 智能运维,毕竟,我不是在测数据库,就是在去测数据库的路上——现在,还多了一条去圆桌会的路。
⚠️ 作者注:当前国产数据库领域呈现多元化发展格局,各产品均在各自技术路线与应用场景中持续演进,不存在普适的「最优解」。本文中的观点仅为个人思考与实践总结,不代表任何组织或数据库厂商的官方立场,亦不构成任何技术选型建议。